Blog ENG
A cookbook for making your own Watson chatbot
What is a chatbot?
Chatbot is a term that refers to virtual assistants based on artificial intelligence that improve and automate some business processes by simulating a human as a conversational partner. By saving time and resources, they help people so that they can dedicate themselves to other, more important tasks. Chatbots are most commonly used to automate customer support by eliminating repetitive questions, and the benefits of using them are constant availability and instant and consistent answers.
Chatbots today come in many “colors” and with a variety of features:
- transactional type of chatbot – a chatbot that guides the user through a process, such as transactions, problem reports, etc.
- knowledge chatbot – the chatbot is trained on a topic, for example it can answer frequently asked questions, provides users with information, and comes in two variants:
- a chatbot that is explicitly trained on a defined set of questions (and answers) – when receiving a user query, it classifies the query and returns the answer to the most similar question (or additionally analyzes the answers and looks for some similarities)
- a chatbot that performs semantic search of documents – there is no need for an explicit definition of questions and answers, only a knowledge base is needed, i.e. a collection of documents, and the chatbot then searches the knowledge base for documents, snippets or sentences most likely to be relevant to the user query
What is Watson Assistant?
Today, the IBM Watson platform is the world’s leading platform for reaping the benefits of artificial intelligence and natural language processing to improve your own business processes. The two tools within this platform that are most important for creating virtual assistants (so-called conversational interfaces) are Watson Assistant and Watson Discovery.
Watson Assistant is a tool that makes it very easy to create your own chatbot for your own business purposes by training it on examples of user queries. We will use it to create a chatbot within this blog post.
Watson Discovery is a tool that allows you to create, among other things, a chatbot with semantic search functionalities, by creating document collections and inserting it into the Watson Assistant via search skills. Since this combination of the two tools is somewhat more advanced, we will cover it in a future blog post.
What is needed to start making chatbot?
First you need to create an IBM Cloud account, create an instance of the Watson Assistant tool (there is a lite instance, which is completely free, with some restrictions) and run it. After launching the tool, we come to the basic interface of Watson Assistant where you need to make your first skill. A skill is, as the name suggests, a skill that the chatbot possesses. For the needs of this cookbook, we will need a dialog skill.
Digression: a chatbot can have more than one skill, e.g. we can combine a dialog and a search skill to achieve a chatbot that responds to user queries with defined answers if it knows the answer using the dialog skill, and if it doesn’t, it searches the knowledge base (collection of documents) to find potentially relevant information for the user using the search skill.
Premise
Through this cookbook, we will create a chatbot that will be able to answer a question about the working hours of offices and provide contact information for each office.
Approximate time needed to reproduce the example: 30 minutes.
Intents
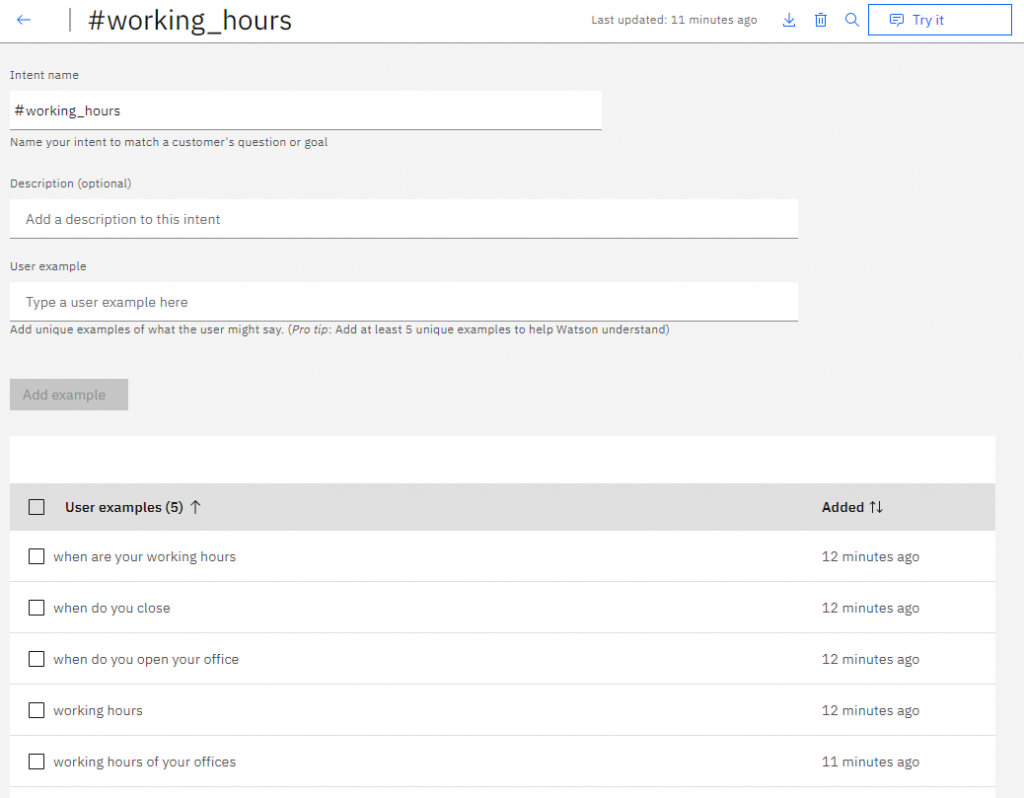
The training of a Watson chatbot begins with creating intents (denoted by #intent). A single intent indicates a single topic that the chatbot covers, and is defined by a set of examples of user queries. For example, for the intent #working_hours we will put a few examples like “when are your working hours” and “when do you close”.
We will do the same for the intent #contact, where we will enter additional user examples using entities, e.g. “what is the address of the office in @office” (entities explained below).
Note: in order for the user to get an answer for the intent #working_hours, they don’t have to guess the exact user examples that we specified, but the AI in the background recognizes similar queries, to some extent (depending on how well we have trained it).
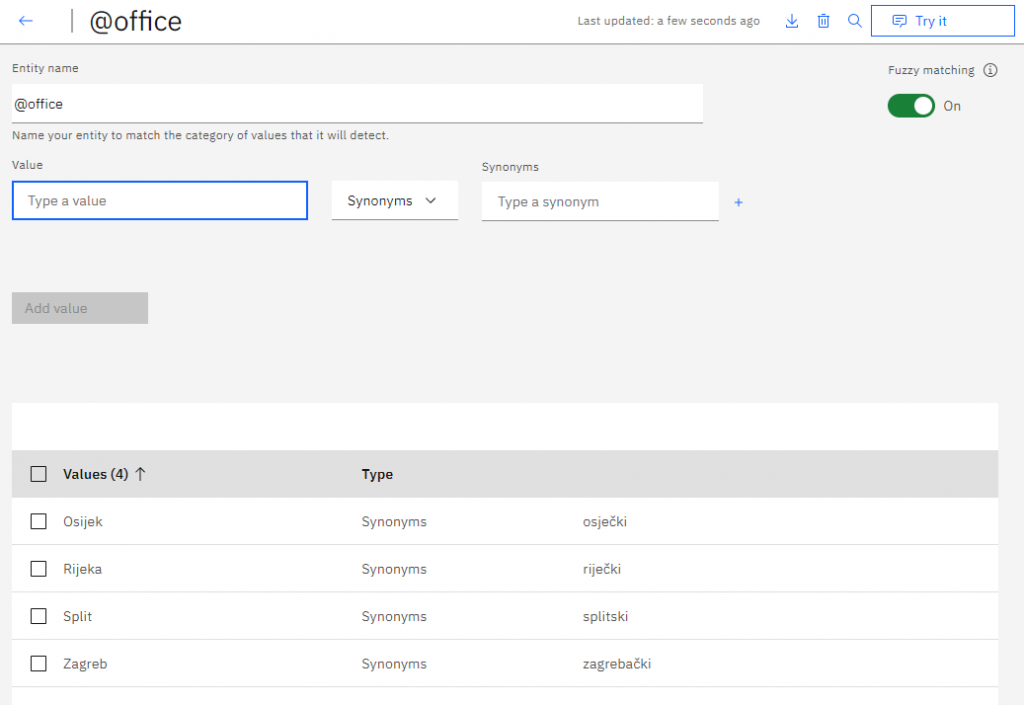
Entities
Entities are additional parameters that we can “capture” within a user query, and which modify the query, i.e. the context around the intent (denoted by @entity). For example, if we have offices in Zagreb, Split, Osijek and Rijeka, we do not have to do four different intents, but we can list examples in the intent #contact using the entity @office instead, which contains all possible offices.
Dialog tree
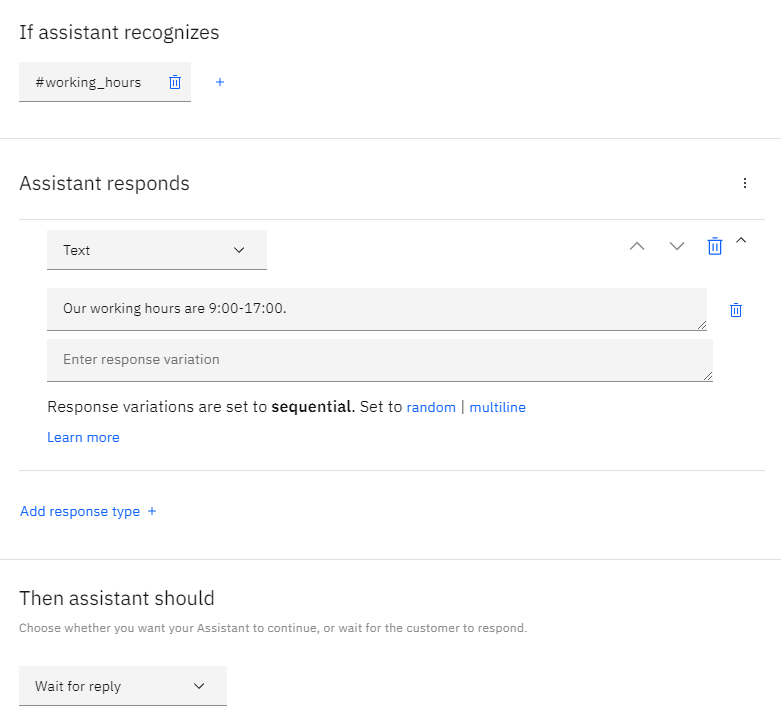
Within the dialog tree (Dialog section) we define the behavior of the chatbot when it recognizes a particular intent or entity within a user query. The dialog tree/structure is analyzed in the vertical downward direction when the query is received, and if the condition is met in a certain node, the action specified in that node is performed (usually a response is returned to the user).
When we first open the dialog tree, we are greeted by two nodes – Welcome and Anything else. Welcome is a node that contains a greeting message and is activated when the conversation starts, and Anything else is a node that is activated if no preceding node in the dialog structure is activated (the chatbot did not understand the user’s query). Each node within the dialog structure is defined in the form of “if-then”, so we will define our first node in such fashion, which gives an answer about working hours if the user asked about the working hours (if the chatbot recognized the intent #working_hours).
We will then define a somewhat more complex node that has child nodes, nodes that go into the depth of the structure (branching). The top node (parent node) will have the condition that the intent #contact is recognized, while the child nodes will have the condition that the entity @office is recognized (the last one will have the condition “true”, which is always true, for cases when the user did not specify the office location, something like the “else” clause in programming). Our dialog structure will then look like this:
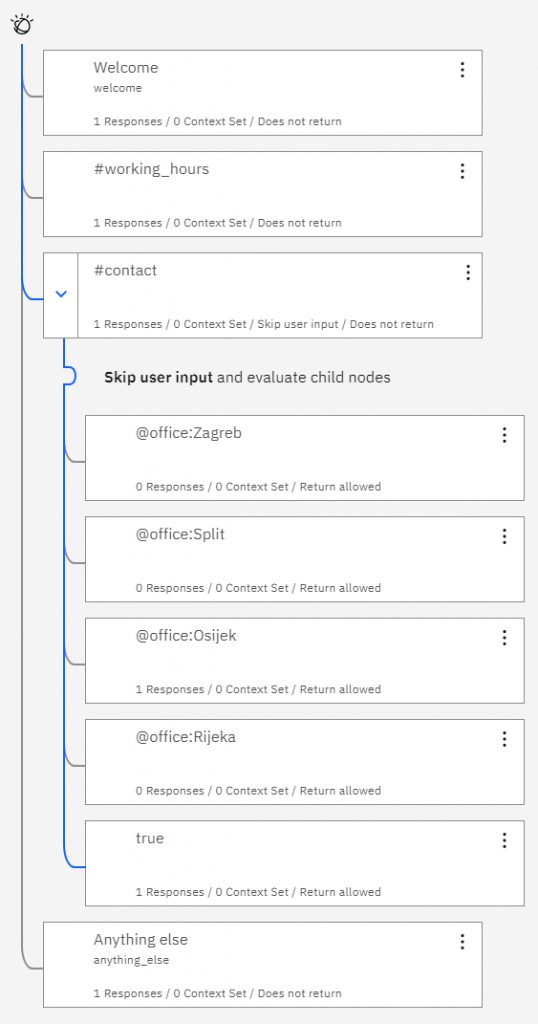
Note: in the parent node it is necessary to specify the action “Skip user input and evaluate child nodes” at the end of the node definition.
Now, when asked “contact office Zagreb”, the top node #contact will be positively evaluated, then the child node @office:Zagreb and thus the chatbot will return the contact information for the office in Zagreb. Within each of these four child nodes, we will define which response is returned (for each office its contact info).
In addition to the four nodes, we will additionally define a fifth child node, which will be activated if the user has not specified an office location. We can be creative here, so we will give the user an answer in the form of options (Option response). When defining the response in that node, select the Option response type and define the options as follows, in the form of key-value pairs:
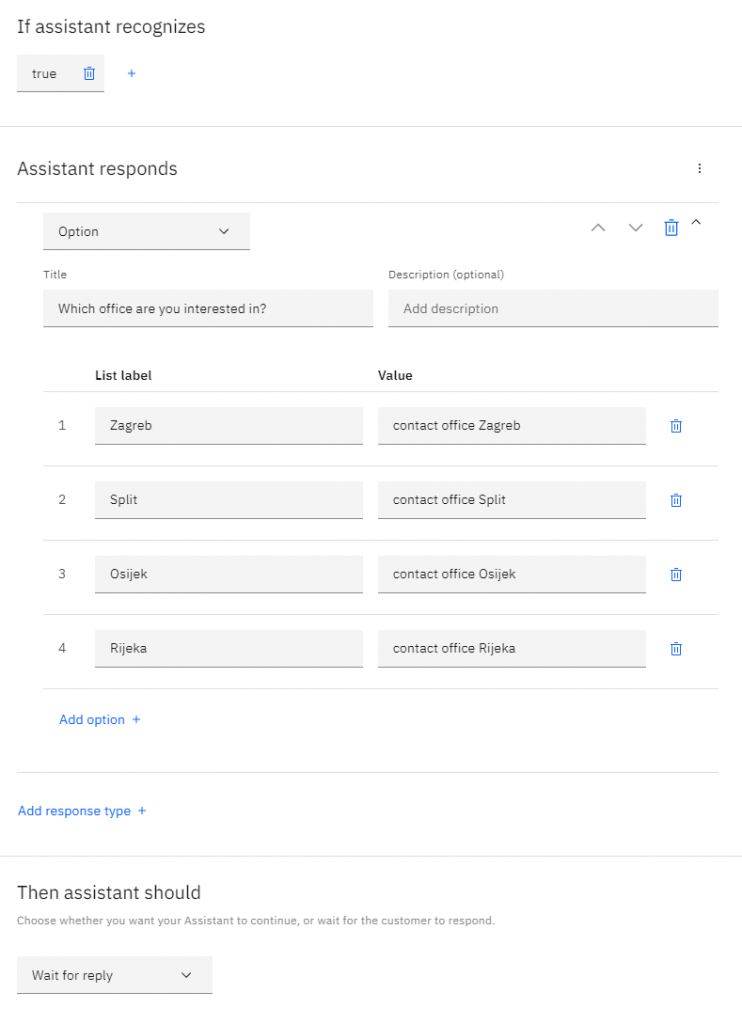
For example, if the user clicks on “Osijek”, the value of “contact office Osijek” will be entered into the chatbot as if it were a new user query and the user will receive contact information for the office in Osijek.
An example of a chatbot conversation is shown below (integrated Try it out section).

If you want to learn more about creating Watson chatbots or practical use cases of virtual assistants, you can contact the author of this blog post at domagoj.maric@megatrend.com.