Blog ENG
Machine Learning deployment services
The main goal of this blog is to demonstrate how to serve a deep learning model for image classification. The most widely used tools for serving deep learning models via API are NVIDIA Triton Inference Server, TensorFlow Serving and TorchServe. TensorFlow Serving is used to serve deep learning models implemented in the TensorFlow framework and TorchServe is used for PyTorch models. NVIDIA Triton, however, serves models implemented in various frameworks.
In every example we’ll use the same model: MobileNetV2 pretrained on the ImageNet dataset.

NVIDIA Triton Inference Server
Let’s get started with Triton since it offers the widest range of possibilities.
TensorFlow model
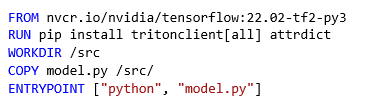
Let’s start with instantiating and serializing MobileNetV2. The recommended way from the official documentation is within the Docker environment designed by NVIDIA.
There are several ways to achieve this, we suggest the following Dockerfile:
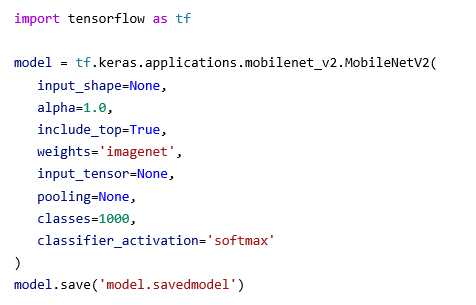
All we need is a few lines of code in Python:
Serialization is performed within the Docker environment that has all the necessary libraries preinstalled:
docker run \
    --gpus all \
    --rm \
    --name nvidiatensorflow \
    -v /directory/to/store/the/model:/src/model.savedmodel \
    nvidiatensorflow
The Triton server expects the models and their metadata to be arranged in a specific format. The following is an example for the TensorFlow and PyTorch model, respectively:
tfmobilenet
├── 1
│   └── model.savedmodel
│       └── serialized files
├── config.pbtxt
└── labels.txt
torchmobilenet
├── 1
│   └── model.pt
├── config.pbtxt
└── labels.txt
After we’ve serialized the model, we need to describe it, specifically, what its inputs and outputs are, their dimensions and formats. This is what the config.pbtxt file is for:
name: "tfmobilenet"
platform: "tensorflow_savedmodel"
max_batch_size: 8
input [
  {
    name: "input_1"
    data_type: TYPE_FP32
    dims: [ 224, 224, 3 ]
    format: FORMAT_NHWC
  }
]
output [
  {
    name: "predictions"
    data_type: TYPE_FP32
    dims: [ 1000 ]
    label_filename: "labels.txt"
  }
]
There are several ways to determine the names and dimensions of the input and output tensors:
- one way is to print the model summary using the model.py script and inspect the output, below is a simplified output where the names of input and output tensors are marked in red
Model: "mobilenetv2_1.00_224"
____________________________________________________________
 Layer (type)                   Output Shape         Param #
============================================================
 input_1 (InputLayer)          [(None, 224, 224, 3)]  0

...

 predictions (Dense)         (None, 1000)             1281000
=============================================================
Total params: 3,538,984
Trainable params: 3,504,872
Non-trainable params: 34,112
_____________________________________________________________
- it’s possible to inspect the serialized model architecture with the saved_model_cli tool, here’s a simplified output
signature_def['serving_default']:
  The given SavedModel SignatureDef contains the following input(s):
    inputs['input_1'] tensor_info:
        dtype: DT_FLOAT
        shape: (-1, 224, 224, 3)
        name: serving_default_input_1:0
  The given SavedModel SignatureDef contains the following output(s):
    outputs['predictions'] tensor_info:
        dtype: DT_FLOAT
        shape: (-1, 1000)
        name: StatefulPartitionedCall:0
  Method name is: tensorflow/serving/predict
The Labels.txt file contains a list of all classes in the ImageNet dataset.
Sending a request to the Triton server is performed using the tritonclient library. There’s also a convenient script that wraps this library into a simplified interface to the Triton server API. Here’s an example:
python send_request.py kitten.jpg --model-name tfmobilenetWe get a response:
['0.683438', '285', 'Egyptian cat']PyTorch model
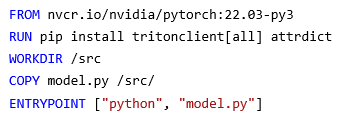
Let’s do the same thing with a PyTorch MobileNetV2 model. The official Triton documentation recommends performing this within a custom Docker environment. In this case, we recommend this Dockerfile:
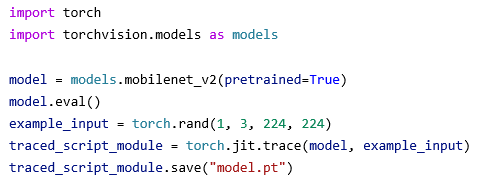
PyTorch models for Triton inference have to be serialized using TorchScript. Here’s a MobileNetV2 example:
This example should be executed in a Dockerized environment:
docker run \
    --gpus all \
    --rm \
    --name nvidiapytorch \
    -v /directory/to/store/the/model:/src/torchmobilenet \
    nvidiapytorch
Just like the TensorFlow example, the architecture of this PyTorch model has to be described with a config.pbtxt file.
name: "torchmobilenet"
platform: "pytorch_libtorch"
max_batch_size: 8
input {
 name: "input__0"
 data_type: TYPE_FP32
 dims: [3, 224, 224]
 format: FORMAT_NCHW
}
output {
 name: "output__0"
 data_type: TYPE_FP32
 dims: [ 1000 ]
 label_filename: "labels.txt"
}
default_model_filename: "model.pt"
The main difference between the PyTorch model and the TensorFlow model is the ordering of input dimensions.
| TensorFlow model | PyTorch model | |
| 1. | batch | batch |
| 2. | height | RGB |
| 3. | width | height |
| 4. | RGB | width |
Sending the request to the PyTorch model is done using the same script for the TensorFlow model, here’s the response:
['15.189675', '281', 'tabby']
TorchServe
The simplest way to run TorchServe is using Docker.
TorchServe comes with a tool for exporting PyTorch models in the proper format. Here’s what we need:
- a serialized PyTorch model used for Triton inference
- an ImageNet file that maps model output indices to class names
Here’s the command:
docker run \
   --rm \
   -it \
   --gpus all \
   -v /input/serialized/model/path:/home/model-server/inputs \
   -v /directory/to/store/the/exported/model:/home/model-server/model-store \
   --name torchserve \
   torchserve \
   torch-model-archiver \
   --model-name mobilenet \
   --serialized-file inputs/model.pt \
   --handler image_classifier \
   --version 1.0 \
   --extra-files inputs/index_to_name.json \
   --export-path model-store
To start TorchServe:
docker run \
   --rm \
   -it \
   --gpus all \
   -v /directory/to/store/the/exported/model:/home/model-server/model-store \
   --name torchserve \
   -p 8080:8080 \
   torchserve \
   torchserve \
   --start \
   --model-store model-store/ \
   --models mobilenet=model-store/mobilenet.mar
Sending a request to TorchServe is a bit simpler than sending a request to Triton, curl is more than enough:
curl http://localhost:8080/predictions/mobilenet -T examples/cat.jpegHere’s the response:
{
 "tabby": 0.45494621992111206,
 "Egyptian_cat": 0.41108807921409607,
 "lynx": 0.0843689814209938,
 "tiger_cat": 0.0472283735871315,
 "leopard": 0.000700850214343518
}
TensorFlow Serving
For TensorFlow Serving we can reuse the model we’ve exported in the Triton example. The directory structure is fairly similar to the Triton directory structure. There are several ways to define a model configuration, we’ve used a config file that defines the model name and a path to the serialized file.
model_config_list: {
 config: {
    name: "tfmobilenet",
    base_path: "/models/tfmobilenet",
    model_platform: "tensorflow"
 }
}
Here’s an example of a directory structure:
├── models
│   ├── models.conf
│   └── tfmobilenet
│       └── 1
│           └── serialized files
├── models.conf
This time it’s up to the reader to send a request to the server, here’s a helpful snippet:

Conclusion
Finally, it’s important to mention that while these tools have many benefits, it shouldn’t come as a surprise that they come with certain drawbacks. Most of these drawbacks arise when dealing with more complex models. However, the main focus of this blog was a quick review of these tools. We recommend getting familiar with all these tools in order to increase your chances of a successful ML model deployment.